Make a Large Magnetic Travel Pin Map for Under $100
Posted on September 18, 2018 Leave a Comment

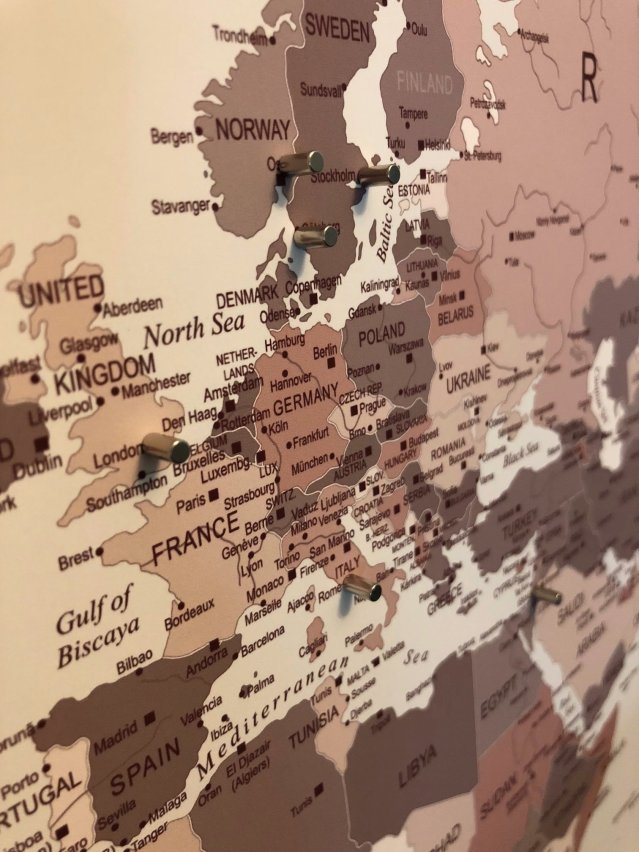
Did you ever want to pin your travels but don’t want to ruin your beautiful poster with holes? How about using magnets? The pre-made magnetic map boards can be very pricey and not very visually appealing. So, why not make your own???? Let’s DO THIS!
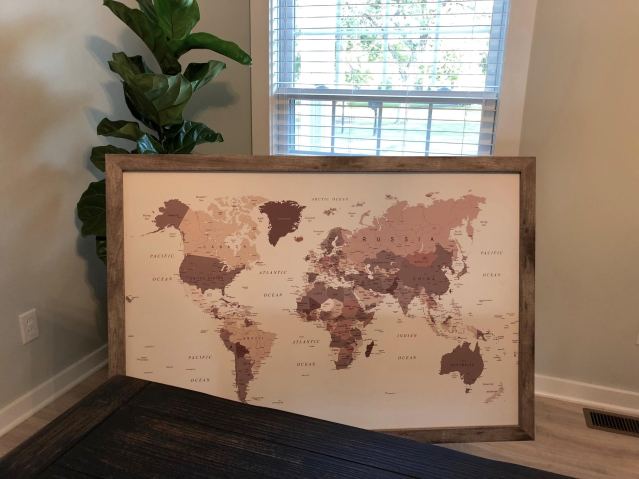
Map via UrbanEpiphanyStore on Etsy
I’ve found that the optimal size for usage as well as product availability is 24” x 36”.
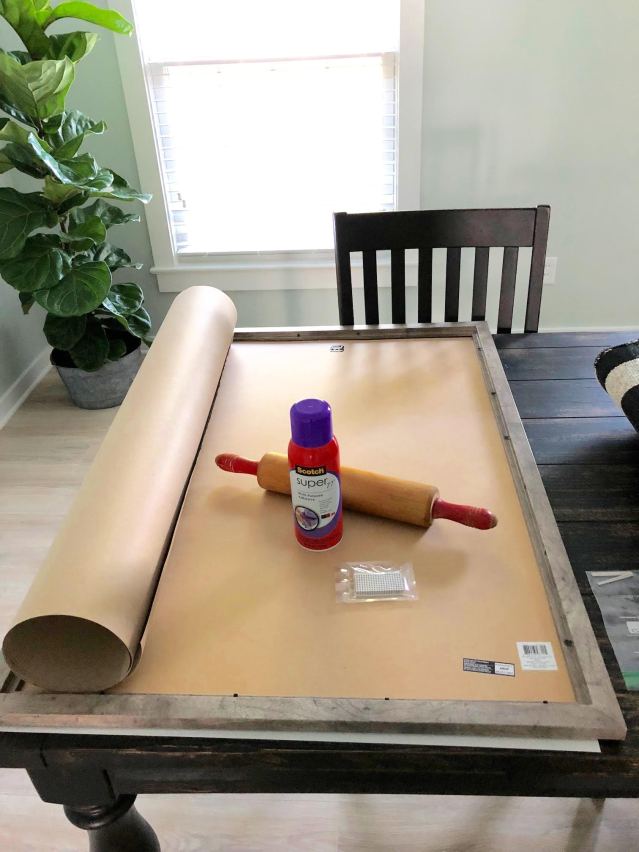
Supplies:
24” x 36” Map or Map Print (I ordered mine from this lovely shop on Etsy)
24” x 36” Poster Frame (Bought off the shelf at Michael’s)
24” x 36” Galvanized Sheet Metal (Bought at Lowe’s off the shelf in the plumbing dept.)
Magnets (I found these teeny tiny ones on Amazon – careful with these around kids!)
Newspaper or other protective paper to avoid adhesive on your workspace
Rolling pin or another heavy smooth item to gently smooth the paper onto the sheet metal
Scotch Super 77 All Purpose Spray Adhesive (any craft store should have this)
I prefer Scotch Super 77 adhesive because it has not been a problem for me with any dripping or soaking through the paper. I would not skimp on adhesive, as a cheap product could ruin your poster or perhaps not stick. And this one works on multiple surfaces, including metal.
Step 1: Purchase Supplies and Prepare Your Work Area.
Purchase all of your products and find a clean, flat surface to use that won’t be disturbed for a few days. I used my dining room table.
Step 2: Flatten Your Map or Print.
If you order a rolled print like I did, allow your print to flatten for a few days by covering it with protective paper and then very carefully place it flat on your table and then place the sheet metal on top. Remember it’s sharp on the edges – think of what a metal paper cut would feel like… I let mine sit for a few days to ensure no curling. Be careful not to crease the poster — this cannot be fixed.
Step 3: Open Your Frame Pieces.
Open up your frame and discard the glass or plastic facing. Magnets might not hold as tight with this layer and will scratch the surface. I tested this and they scratched my plastic facing. Also, you want to be able to see the detail in your map without reflection. I’m currently using my discarded plastic fronting as a cover for puzzles being worked on 🙂
Step 4: Clean your surfaces.
Make sure your print, sheet metal, and work area are all clean and free of dust, dog hair, crumbs, etc. as everything will show through on your print once you adhesive it to the backing. Try wiping with a lint-free cloth and consider using a can of compressed air if you want to be extra cautious.
Step 5: Adhesive Application.
I suggest doing the adhesive application outdoors if at all possible. If you have not worked with spray adhesive before, let me tell you this stuff gets EVERYWHERE even with controlled spraying. Ever use spray Halloween hair coloring indoors?!? UGH, the mess.
And here is a lengthy but thorough video demonstration of how to mount a poster using spray adhesive.
Cover your entire work area (table or plywood) with newspaper or some other form of protection if you don’t want it to be permanently sticky. I placed mine on my patio table with contractor paper underneath it. Wash your hands thoroughly and dry thoroughly. This would be tough to apply with gloves, but as long as your hands are clean of any oils or makeup/dirt you should be fine. Don’t cut your finger on the sheet metal and smear blood on your (white!) poster like I did. An eraser got rid of it once dry – WHEW!
Place your sheet metal carefully on the covered surface with any tags downward, you don’t want those to show through. Careful, the sheet metal has very sharp edges! Cover the entire surface of the sheet metal with protective paper, leaving about 2-3” on the very end of one short side.
Lightly spray the sheet metal at 8-12” distance in quick sweeping motions, making sure to cover the corners. One sweep or three, don’t go hog wild here, a little goes a long way. Remove the protective paper after and get it far away. You don’t want it sticking to your poster. Let it sit for a minute.
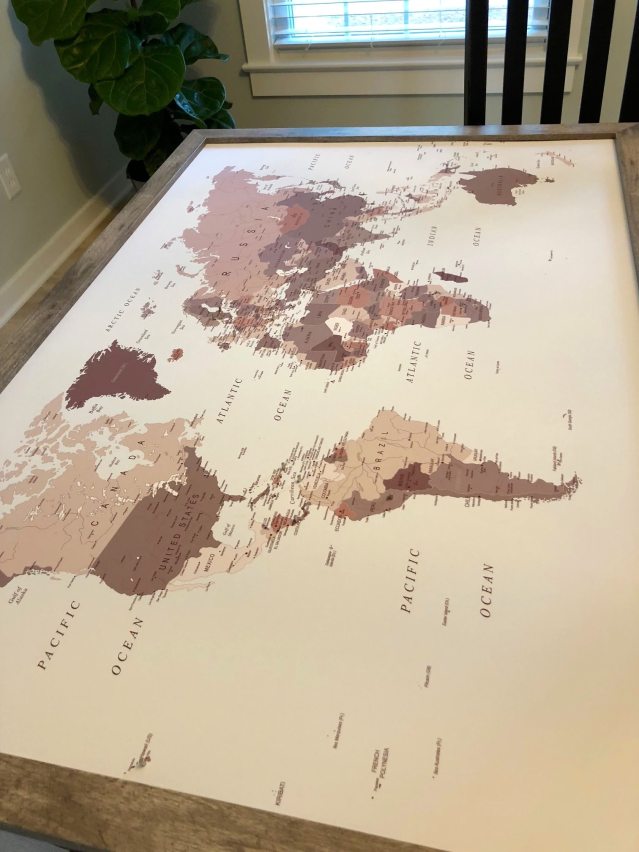
If at all possible, find a partner to help with this step to hold the bottom of the poster while you align the top. Stand at the sprayed short end and very carefully align and apply the poster to the exposed edge, letting the rest lie without creasing it. There is no going back now, so hopefully, you got it straight. Actually, the glue might allow some play but DO NOT SLIDE the poster — pull it gently up and reapply if you need to.
Now, either lay the poster over the already glued side upside down or have your helper hold it up. Spray the remaining sheet metal in sweeps being careful to not get any glue on your poster. Gently lay down the poster as you roll it down in 6” increments. Again, it’s nice to have a partner to help hold the poster while you gently press down over the adhesive.
Once you have the entire poster in place, cover with non-color-transferring paper like contractor paper or poster board and carefully roll out the poster to make sure no air pockets or clumps of glue appear and that the adhesive grabs uniformly. I’ve heard you can use a brick with paper towels underneath but I didn’t want the brick dust around so I used my Grandmother’s rolling pin and it worked like a charm! Then I pressed a hand towel over the entire thing to further seal all of the surface and edges.
Step 6: Assemble and hang it.
Here comes the fun part! Assemble your frame by first laying the frame upside down on your clean indoor work area. If your frame has crimpers, pull those up with a screwdriver or other tool first. Then, very carefully fit in your sheet metal and attached poster upside down in the frame. Remember we are not using the facing glass or plastic.
Then, add the backing material that came with your frame for a tight fit. Now is the time to CHECK and make sure you have your poster in the right direction with your hangers. If all looks good, then push down the crimpers or swivel the latches to hold everything in place tightly.
The sheet metal does not add much weight, so it’s up to you and your wall material to decide if you need just nails or mollies.
Step 8: DECORATE.
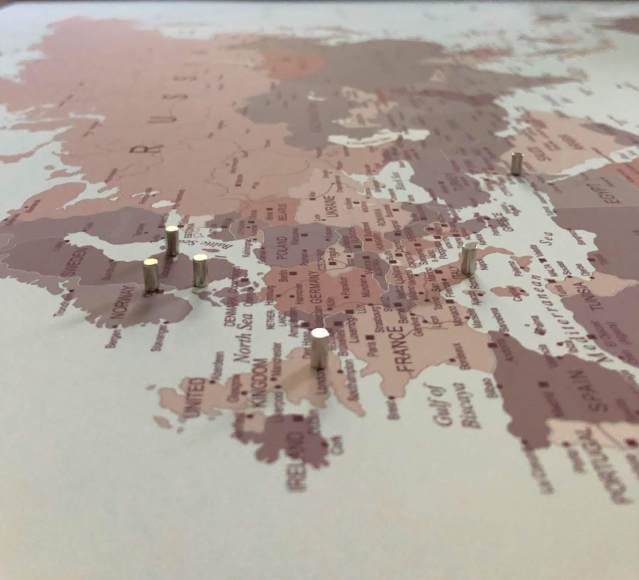
Get out your magnets and start pinning! YAY!!!!!!!!!!!
Some Additional Tips:
Buy tiny magnets. Otherwise, you can’t get very specific with close-range locations because you risk the magnets drawing toward one another. And, remember, please keep those tiny magnets away from little hands! I chose a silver magnet for a subtle aesthetic. I think once mine is hung by my office window the light should help the pins cast lovely shadows of my travel stops.
You can even use different colors for where you have been vs. where you would like to go, or where you have lived, etc. Check out these colored magnetic pins on Amazon!
Other project ideas:
-
- Cover in fabric
- Cover in decorative paper
- Make it a message board or chore chart
- Make it a photo board
- Make it a road map and attach magnets to cars for kids
- Use as an alphabet board
Any other ideas? Please share in the comments! I hope you enjoyed this tutorial! And don’t forget to visit UrbanEpiphanyStore on Etsy for your map print! These come in all kinds of hues and sizes. Check it out!
Adventures in Utah: Mighty 5 (…and some packing tips)
Posted on June 15, 2015 4 Comments
ARCHES NATIONAL PARK
We arrived in the evening to our rental in Moab and “home” for the next 3 nights, then stopped in the Visitor’s Center to grab detailed trail maps, check the weather forecast, and learn more about the park. We planned on doing the Fiery Furnace Ranger-guided tour, but when trying to book in advance – all of the tours were sold out during our stay. So, make sure you book months in advance.
We started the next morning doing the Delicate Arch Trail – a 3-mile out and back moderately strenuous trail that takes you right up to the arch. There were a few scary drop offs – but nothing too terrifying. The wind that day was strong, so this is as close as we were comfortable getting to the gorgeous arch.

Delicate Arch View from Trail
After Delicate Arch we moved on to the next trail. As an alternative to the Fiery Furnace – a Ranger suggested Devil’s Garden, a 7.2-mile out and back trail, for it’s sweeping views and the moderately strenuous nature we were looking for. It DID NOT disappoint! In fact, it was my second favorite trail of all, just after The Narrows. It included some truly unique “I’m on top of the world!” moments, including Landscape and Double O Arches. That made for a long day for us, but we loved every minute of it!
Don’t forget to stop at all the overlooks and see the amazing geological wonders along the way up to the trails. The entire scenic drive is just breathtaking.

Devil’s Garden Trail at Arches

Devil’s Garden Trail at Arches

Double O Arch

Landscape Arch
CANYONLANDS NATIONAL PARK
The next day we reserved for exploring Canyonlands. The Canyonlands Grand View Point easy 2-mile trail is a MUST DO for sweeping views and a dramatic 360-degree perspective. The terrain is interesting and you can get some great photos at the end of the trail.

Canyonlands Grand View Point
We opted for small trails today as we were pretty beat from the 12+ miles at Arches, aside from Grand View we visited Mesa Arch, Aztec Butte, and then Upheaval Dome – which led to another broad viewpoint including various mineral colorings in the dome. Beautiful.

Canyonlands Mesa Arch

Canyonlands Upheaval Dome
And after, Dead Horse Point State Park Overlook. Another panoramic perspective with blue skies overlooking the Colorado River.

Dead Horse Point State Park
CAPITOL REEF NATIONAL PARK
Unfortunately the Scenic Drive was closed one mile in for some reason. So, we were unable to view the Gorge, as planned. But the views at the entrance of the park were lovely.

Capitol Reef
Google maps directed us to take a faster highway route, but we opted to drive through Dixie National Forest and Escalante on 12 to Bryce Canyon — and we’re glad we did! The temps changed quite a bit on the drive, from warm, to cool, to rainy to HAIL and SNOW! It was so interesting seeing such a change in terrain.

Capitol Reef to Bryce Canyon Drive through Dixie National Forest

Driving Through Dixie National Forest
We then stopped at the infamous Hell’s Backbone Grill for a hot coffee to go in Boulder. The menu looked amazing but we had already eaten. Next time! Once we got out of Boulder, the views through Escalante were dizzying and so we stopped several times to soak up the valley on this gloomy day.

Driving Down Escalante Highway 12
BRYCE CANYON NATIONAL PARK
The evening we arrived, our game plan was to drive to the end of the Scenic Drive to catch our views from the top down from over 9,000 feet.

Bryce Canyon Rainbow Point

Bryce Canyon Natural Bridge
The next day we were feet to footpath by 8am to explore the 8-mile Fairyland Loop Trail. It was only 38 degrees when we started but it heated up fast in full desert sun for the length of the trail. This one was a bit brutal. The SUN reflecting off that desert rock was a scorcher in June.

Fairyland Loop Trail at Bryce Canyon

Fairyland Loop Trail at Bryce Canyon
The views were incredible, weaving in and out of the Hoodoos and other interesting rock formations and plant life. Also, you will hear the distinct clicking of some type of flying insect that is hiding by the thousands in the pine trees. I’ve Googled to no avail. They will land on you occasionally, but seemed harmless. We also saw butteries and — I’m no birder, but — pretty sure were falcons, along with this guy that walked right up to anyone as he pleased (see photo below).

Black Bird at Bryce Canyon
This was the first time I’ve ever drained my water reservoir right at the end of a trail. Lots of up and down on this one, so make sure you wear plenty of sunscreen and pack more water than you think you’ll need. ALSO — I would highly recommend starting at the isolated trailhead vs. jumping on from Sunrise Point like we saw a lot of others doing. This way, you’ll get the most sun exposed areas done first and have a little bit of shade at the end as you travel back to your car at the trailhead.

Map Check When I Noticed My Water Getting Low! EEK!
ZION NATIONAL PARK
Ahhhhhhhhh …. ZION. Saved the best for last. Although Arches was my favorite at that point, Zion was the place that inspired me to visit Utah from the start. We arrived in Zion and checked in to our lodge early, which was an unexpected treat. Then we explored the town of Springdale, locating the grocery store, Visitor Center, and some really great gear shops. That night we made the decision that Angel’s Landing was a bit too far outside of our comfort zone.
Next day — Angel’s Landing 😉 Yep, we faced our fears and went anyway, knowing that we could turn around anytime we felt uncomfortable. The switchbacks up to the trail were far more tolling than the perilous last half mile straight up the spine.

Angel’s Landing Zion
The key for me was not stopping and not looking down – at all. I just kept moving and only thought about safety for us and for those around us. I had no problem passing people by grabbing the chains around people’s bodies. I would just say “I’m going to touch you so I don’t fall off!” Haha! No one seemed to mind. There was even a welcoming committee at the top to grasp your hand and pull you up the last step with faces aglow in delight.

Summit at Angel’s Landing Zion
I felt great, but the “going down” part was my major fear from the start. Turns out, it really wasn’t that bad.

Climbing Back Down from Angel’s Landing Zion
And, the last day was reserved for my ultimate Bucket List Trail – The Narrows. We rented the neoprene socks, canyoneering boots, and walking sticks from a local gear shop near the Visitor’s Center so we would be comfortable on our river hike (link below in the tips).

Gear Rental for The Narrows Zion
I’ll let the following photos speak for themselves.

The Narrows at Zion

The Narrows at Zion

The Narrows at Zion
Pretty sure I died and went to heaven while on this trail. I am in awe of the beauty that Zion exudes.
PS: Loved the Driftwood Lodge. I can always find something to grumble about, but this place was delightful in every way. Wonderful free breakfast daily, clean laundry room, beautiful scenery right from your patio if you book a mountain view room, extremely courteous staff, and comfortable beds.

View from our patio at Driftwood Lodge in Springdale – Zion
10 Tips for Hiking Through the Mighty 5, No Matter Your Skill Level
1. There is no such thing as too much water. Make your trip more enjoyable by investing in a hydration pack. We saw many folks carrying water bottles. You’ll be more comfortable and safe being hands-free with a hydration backpack. My favorites are Osprey. I have 3 different sizes for different hikes – small: Verve, medium: Axis, large: Sirrus. I took my Axis for this trip since it has a handy laptop sleeve so I could use it as a carry-on, as well. Was the perfect size for all hikes listed in this post (note: Axis does not include a water reservoir – I just used one from my other packs.)
2. Don’t forget bandaids. I got banged up a bit climbing Angel’s Landing and it was nice to know I had a band-aid once hitting solid ground that wasn’t 1,500 feet in the air. In fact, my stash of multiple sizes of band-aids helped a fellow hiker who was only 1/2 mile into the switchbacks to Angel’s landing who had blisters on both feet from wearing Crocs. While her bandana made a nice set of “wraps” for her feet, she was grateful for the additional protection. In fact, I saw her again at the summit and she thanked me profusely for “saving her day” 🙂
3. Don’t wear Crocs to hike in. Or flip flops. Appropriate choices are trail runners, hiking boots/shoes or whatever is going to give you comfort and a good tread for hiking smooth and steep rocks. I can’t imagine being stuck at the top in rain and having to slide back down in smooth-soled gym shoes or ballet flats.
4. Use Instagram to see what people are wearing. You’ll likely find photos in real time for each hike and can use them as an indication of weather/comfort.
5. In Zion, rent so you can pack light. You can find everything you need from neoprene socks and canyoneering shoes to dry bags, walking sticks, and even backpacks. I lugged my new trekking poles all the way from Cleveland, only to find that the wooden sticks are really your best bet. And there is an outfitter right next to the Visitor’s Center.
6. Start at Arches. We were so glad we chose this route so we could start in a lower altitude and get acclimated, as well as the fact that we wanted to save our most anticipated hike (Narrows) for last. Also, consider investing in a National Parks Pass, it’s worth the $80 for this trip alone and will get you in the “express lane” at some parks.
7. Book airfare based on your park destinations. And not on what the tourism sites tell you – which is to fly in and out of Salt Lake City. We flew into Grand Junction, CO and out of Las Vegas. That’s a lot of extra driving if you go back and forth to Salt Lake City and — hey, Vegas, right?
8. Buy a cheap cooler to keep in the car. Our cooler travelled over 1,000 miles with us and really came in handy for long drives to keep road drinks icy cold and post-hike lunches out of the sun.
9. Pack a variety of snacks for the trails. We took beef sticks, nut/seed mixtures, apples, and dried fruit that was easy to stash in our packs and enjoy while resting at the various overlooks.
10. Pay it forward. Leave things for fellow travelers when/if you can. We were surprised that the condo we rented for 3 nights in Moab didn’t have a few laundry detergent pods or even a starter box of powdered detergent. So we bought a bag and made sure to leave some behind for the next guests. Trust me, you are going to want to wash those sweaty clothes before stuffing them back in your bags.
THE END.
I hope that all of you reading this get the opportunity to visit these beautiful parks and absorb the glorious views on the drives between them. “The world is a book, and those who do not travel read only one page.” – Saint Augustine
Tuscan Bean & Vegetable Soup with Chicken
Posted on November 3, 2013 Leave a Comment

Lots of Fresh Ingedients
This delicious and hearty winter soup is a labor of love, but well worth the effort! This recipe is by Cooking Instructor Kathy Lehr, from a class that I attended at The Culinary Vegetable Institute in Huron, Ohio. I made a only a few modifications from Kathy’s recipe and that was adding chicken and suggesting crostini for the garnish, as Kathy made her own bread at the class. Your entire house is going to smell delicious as this slowly simmers for a few hours. Enjoy! In fact, make a double batch and share with your friends and family. I made a double today and it’s enough for a Browns football party with 20 people, some to take to my Mom, and enough for leftovers tomorrow 🙂
Ingredients:
- 1 large onion chopped
- ½ cup olive oil
- 7-8 garlic cloves finely chopped
- 2 large carrots chopped into ½” pieces
- 9 cups chicken stock (not broth – I use Rachel Ray’s Stock-in-a-Box)
- 1.5-2 pounds plum tomatoes finely chopped
- 3 large sprigs basil, fresh with stems
- 3 8-oz. cans beans of your choice (I use butter beans and great northern beans)
- 1 large bunch of escarole or kale (I prefer escarole but kale holds up better)
- One whole nutmeg (the nut, not the spice – not necessary, but adds a nice flavor)
- One whole roasted chicken (store bought or prepare your own)
For Garnish:
- 3 large sprigs of fresh basil chopped
- Fresh parmesan cheese (for grating, and keep rinds for soup)
- Crostini (optional)
Instructions:
Saute onion in the olive oil until softened. Add the garlic and carrots. Saute another minute. Add chicken stock and bring to a boil. Add tomatoes and juice to stock along with beans (drained and rinsed if canned), 3 whole sprigs of basil, and parmesan rinds (the rinds are what really makes it “Tuscan” flavored). When soup turns to a boil, reduce heat to medium, and boil gently, uncovered for about 1.5-2 hours.
Roll up your sleeves and pick that chicken CLEAN with your hands. Remove any skin, visible fat, and veins. Shred the entire chicken. In the last ½ hour, add shredded chicken to the soup.
Before serving, add cayenne pepper and a just a few passes of fresh grated nutmeg (again, the grated nut, not the spice). Simmer a few minutes. Remove whole stems of basil and parmesan rinds. Add chopped basil (saving a bit for garnish). Salt and pepper to taste. Add the escarole or kale. Ladle into bowls and sprinkle with fresh grated parmesan cheese and top with basil to garnish. Also, you can add pieces of crostini to the garnish if you like (delicious, but CARBS…)

Vegetable Goodness
I bought my Crostini at the Giant Eagle Bakery. They have huge bags for about $6.

Crostini Bread for Garnish
CrossFit Ladies: Does Bar Size Matter?
Posted on July 20, 2013 1 Comment
Disclaimer: I just started CrossFit in December of 2012, so I am BY NO MEANS an expert. I am NOT a coach. This is simply MY OPINION, not that of my gym or any CrossFit association. That being said…
I’ve had this debate for a few months now regarding grip for women, and particularly, women using a smaller bar designed for them vs. the more universally accepted one-size-fits-all men’s bar. Rogue lists women’s bars at 25mm diameter, and the men’s or “standard” bar at 28.5mm diameter. So, a 3.5mm difference. Can that be a huge difference, those measly 3.5mm’s? For me and many of my CF female friends the answer is YES, at a price of roughly 20 pounds.

15kg Rogue Bella Bar
I found out by accident as I shrugged off the “girls’ bar” as soon as possible to avoid the stigma of being a newbie at my gym. But when I ended up with the women’s bar anyway, I found that I could launch weight up a lot easier overhead with that bar. Granted, there is approximately a 10# difference, but it’s easy to add 5’s or other plate sizes to make up for it, if needed, on prescribed weights. This is NOT a weight issue. It’s a grip issue…
Let’s talk about the hook grip. In this CrossFit article, Mike Burgener says…
“Anytime you are gripping this PVC pipe for a snatch or a clean, you must always have the hook grip!”
And that’s with PVC pipe. The article further explains how important the hook grip is to hit PR’s and, frankly, to safely thrust weight over your head. So, what happens is, people with smaller hands (or unusually small ones like mine) do not have a solid grip. My fingers barely even touch when wrapped around a standard bar. Let’s say you have the hand size of an 8 year old girl, but you are a 5’0″ adult woman, compared to the Hulk-sized hands of your male CrossFit counterparts. Do you think they would have the same grip strength?
Even with lifts that don’t require a hook grip, I find the women’s bar to be much more comfortable on my small frame. The bar just “fits” nicely in my rack hold for front squats, is easier to white-knuckle on bench presses, and helps me to avoid slippage on deadlifts.

Gaining a Big PR with Rogue’s Bella Bar
I’m not suggesting that barbells are gender-biased, I’m suggesting that they are size-biased. We don’t all use the same wall ball weight or use the same kettle bell size, so why the normalcy of a “universal” bar size? Also, if a woman has larger hands and prefers the men’s bar – more power to her (and more availability for me to use the girls’ bars).
Also, the bar length comes into play. If your shoulders are more narrow than your counterparts, a shorter length bar can be a relief when throwing around heavy weight.

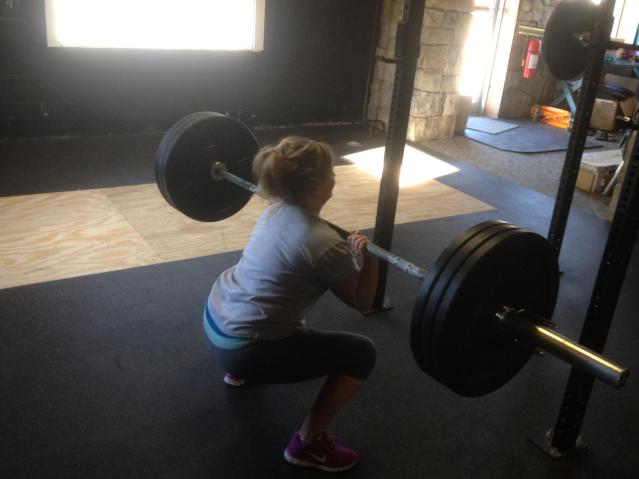
15kg Bar on Back Squats
Also, how about when someone has a 55# PR for strict presses and has to warm up with 45#s after the PVC? Also, consider the fact that prescribed weights are scaled for gender. Again, wall balls and kettle bells come in various sizes; weight belts and resistance bands come in a variety of sizes – so why is it not more commonly-accepted to have various barbell sizes? I’m not saying that ALL women should use the smaller bar, just that it should be made available to them — because size DOES matter.
And here are some supporting articles that are worth a read:
“…and ladies barbells (generally around 25mm) are optimized for the size of the hands gripping the barbell. Smaller hands ‘like’ smaller diameter barbells. If athletes lift barbells that are ‘too big’ for their size of their hand the lift is made much more challenging (all other things held equal). That is to say, the ratio of hand size to object size correlates directly to lift capacity.” Source: CrossFit Belair
“If you are a weightlifting club, or an athlete looking to compete, it is essential that the women’s barbell is owned by your club and used in training. There are a number of reasons for this, which generally stem to one thing… Psychology.” Source: UK Olympic Weightlifting
Finally, how many female CrossFitters use women’s bars? I have not found much evidence of mainstream use on the interwebs, but I did find out that a few girls use the women’s bar when competing, namely:
- Julie Foucher – Bar: Rogue Bella Bar (photo)
- Annie Thorisdottir – Bar: Rogue Bella Bar (photo)
- And my inspiration at the gym, Paige Samek – Bar: Rogue Bella Bar (see pic below)

Paige with Rogue Bella Bar, CrossFit Open 2013
So, in my humble opinion, to suggest that women who prefer the smaller diameter bar should just “suck it up” and use the men’s/universal bar — you are missing the point entirely.
I digress. And I thank my awesome gym owners, Erin and Mark, for investing in some additional 25mm diameter bars for us that have smaller paws or are grip-challenged – as our membership grows. You guys ROCK! Thanks for helping to deflect any more bickering over who gets the girls’ bars and for investing in tools to help us succeed. And, yes, I know I look terrible in this pic, but I worked so hard to look that disgusting 🙂

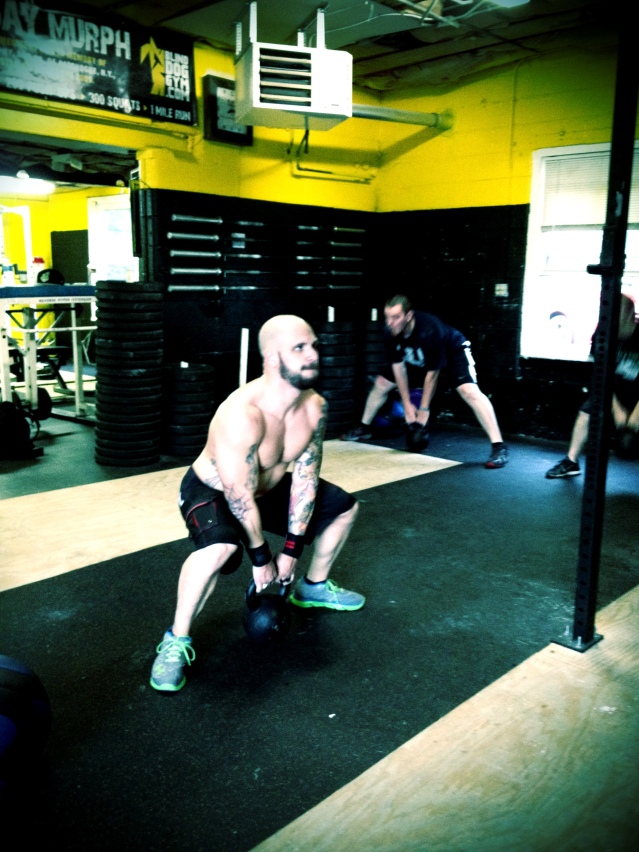
New Ladies’ Bars at Blind Dog Gym!
Biking Adventures: North Coast Inland Trail
Posted on July 7, 2013 1 Comment

North Coast Inland Trail at Elyria Trailhead
Enjoying my favorite bike trail today inspired me to share some shots that I’ve taken in different seasons and some detailed info about the trail. This trail is a little less known in our metro parks system, as it’s tucked away on an old railway. It boasts 13.5 miles of country-side beauty far away from the hustle and bustle of roadways, making it a welcoming and safe alternative for road biking. The trail is part of Visit Lorain County’s Back Roads & Beaches route.

North Coast Inland Trail – Scenic View between Elyria and Oberlin
From the Lorain County Metro Parks website:
The North Coast Inland Trail (NCIT) is a 12 foot wide, asphalt paved trail, built over the abandoned Toledo, Norwalk and Cleveland Railroad and runs for 65 miles from Elyria to Toledo with some sections still being built. In 1992, seven park districts agreed to develop a system connecting trails in northwest Ohio, each managed by local jurisdictions. The NCIT is the result.

North Coast Inland Trail – Scenic View Approaching Oberlin
The trail stretches from Elyria, OH to Kipton, OH with plenty of scenic stops along the way, most notably the small liberal arts town of Oberlin, OH that is conveniently located in the middle of the trail. Signage is clear and the trails are impeccably maintained by the Lorain County Metro Parks.

North Coast Inland Trail – Intersection Approaching Kipton

North COast Inland Trail – Scenic View Between Elyria and Oberlin

North Coast Inland Trail – End in Kipton

North Coast Inland Trail – View Approaching the Town of Kipton

North Coast Inland Trail – Scenic Bridge View in Autumn
Things to bring: Aside from any emergency gear you would normally carry — cell phone, sunscreen as most of the trail is open to sun, bug spray if you plan on stopping as you will be in some wooded and wet areas along the trail, plenty of water – you can refill in Oberlin at the train station, and a camera to capture the gorgeous scenery along the way.
40 Signs of CrossFit Addiction
Posted on June 25, 2013 3 Comments
After 6 months of dedication to CrossFit, I’ve realized that there are a lot of eccentricities that go along with being a part of this fitness regimen. Some are humorous, some are endearing, and some are downright embarrassing – but we all have them. I’ve listed 40 here that I think at least a few of you can relate to. Please add your own in the comments.
40 Signs That You May Be Addicted to CrossFit:
- You are reading THIS.
- You know from experience that a 7-minute workout can be the most grueling 7 minutes of your life.
- A roll of tape is your Best Friend.
- Spilled Spark is reason for tears.
- You know for certain that it only takes 90 seconds to go from Freezing Cold to Devil Hot in the middle of winter at your box.
- When someone yells at you “Ass to Grass!!!” you immediately oblige.
Not low enough!!!
- When your coach posts “Learn to Snatch or DIE!” on the board, you consider the workout a Rite of Passage.
- You stop inviting your friends to join because you don’t want the gym to get too crowded.
- When you happen to see your gym friends outside of the box, you have no idea who they are for at least a second or two. Is that hair and makeup? Are those jeans you’re wearing???
- You’re seriously considering installing a pull-up bar in your garage and/or basement.
- Rest days are usually spent chopping wood, running massive amounts of miles or doing any other physically-tolling activity on your To Do List.
- You put your bike rack on your car and silently sigh… “Who am I kidding?” You certainly don’t have time for THAT.
- You text your coaches inappropriately late at night and they always answer, even if it’s just to say – “Go to bed, Kid.”
- You have a nickname. “V-Rex.”
- Gym socials = adult recess. There WILL be arm-wrestling and partner squats.

Partner Squats. Oh yeah!
- You do air squats in your office/workspace when no one is looking.
- When you lace up your Nano’s – you have this playing loudly in your head.
- Your entire photo album on your phone is gym pics.
- You watch Game of Thrones on your lunch break.
- Your Google search history has nothing but Rogue, your gym’s FB page, and Crossfit.com visits.
- A group text message thread will lead someone to say – “If one more person sends a text, they are getting round-housed”.
- You get busted stretching your hamstrings in the office break room and someone thinks you’re having a heart attack.
- There’s a guy at your gym that always takes off his shirt, yet says repeatedly – “My eyes are up HERE!”. And you laugh every single time.
Shirtless is how I roll.
- You feel disgusting and must confess your lapse in judgment on Facebook if you dare to eat a slice of pizza, or anything else non-Paleo.
- You call your previously designated “friends”, your “non-CrossFit friends”.
- Your Mom continuously inspects your bruises and asks when you’re going to “stop this nonsense”.
- Your significant other eventually says – “Yeah. It definitely IS a cult.”
- You dream at night about how to improve your snatch or clean-and-jerks.
- No expense is spared on t-shirts.
- You’re not having fun until someone is bleeding.
- You research local boxes before choosing your hotel location for vacations.
- Your co-workers walk up to you and give you their best flex pose and a “RAAWWWWRRRR” at any random time.
- Your friends note that you are ALWAYS wearing gym clothes. (Always prepared.)
- There will be some amazing things happening in people’s personal lives, which you will be a big part of.

Awwwwww!!!!
- As summer gets close, you investigate which of your CrossFit friends have pools.
- You’re considering a second job to fund all of the extracurricular throwdowns, races and fundraisers that you’ve been invited to by your box friends.
- You have an Excel spreadsheet of your quarterly goals. And you are not ashamed to admit it.
- You stop worrying about being tagged in photos from your gym, because you worked so hard to look that disgusting.
- When you travel, your CrossFit friends post daily on your FB wall with digs about your weaknesses — just to let you know that they miss you.
- You can’t stop talking about CrossFit. The End.


Please add yours in the comments 🙂 CrossFit has been an interesting adventure for me, and I’m sure it has been for you all, as well. I chose 40 reasons because I turn the Big 4-0 this year. UGH! But I’m in the best shape of my life at almost 40, so I’m not complaining.
Protein On The Go
Posted on June 9, 2013 Leave a Comment
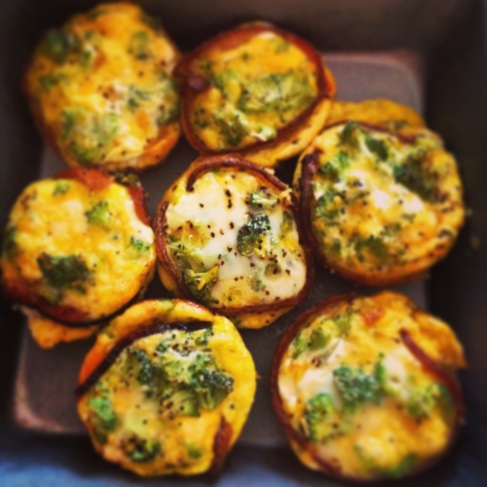
Mini Bacon Veggie Omelettes
Makes 8 Omelettes (but you can see the trend here to make more…)
- 4 Large Whole Eggs
- 4 Large Egg Whites
- 1 Small Bunch of Chopped Broccoli Florets (or any other veggies)
- 8 Extra Thick Slices of Bacon
- Shredded Cheese (optional for you 100% Paleo peeps)
- Salt/Pepper
- Dash of Milk or Almond Milk
- Muffin Pans
- Non-stick Spray or Foil Liners
- Heat Oven to 350′
- Cook Bacon on Stove until done for Thick, but slightly less done for Thin Bacon – you need to be able to bend it.
- Spray Muffin Tins with Non-Stick Spray — or use foil liners – I will try this next time.
- Mix eggs, veggies, cheese, milk. (No need to beat it, just make sure the yolks are broken.)
- Drain and pat bacon.
- Place bacon in a circle inside the muffin tin as a liner while it’s still warm.
- Use a small measuring cup to pour egg mixture into the muffin tins. Try to keep mostly inside the bacon liner and don’t fill them to the top, because they WILL rise.
- Sprinkle salt/pepper on top.
- Bake for 20-30 minutes or until done (my oven is very old and terrible, so you likely won’t need to bake yours for as long, just keep an eye on it so you don’t burn the bacon).
I didn’t wait for them to cool, I just went ahead and removed them with a flexible baking scraper/spatula and put them in another cake pan to store in the refrigerator. I don’t know if they freeze well, but they should last at least a few days in the refrigerator.
I suppose you could chop the bacon and place in the egg mixture, but the whole bacon strips really help to hold it all together. They easily fall apart with a fork, so no knife needed. Great quick and easy breakfast option for those of us that don’t want to get up early to cook our protein.
PS: There are only 7 in the photo, because I just had to test one before sharing 😉

Costa Rica Adventures
Posted on May 19, 2011 Leave a Comment

Playa Del Coco Sunset
We had 7 full days to explore and relax after flying into Liberia Airport and getting our rental SUV. I’ll try to keep this short (oh, who am I kidding?…. It’s gonna be LONG)! (May 2011)
Accommodations: We stayed at a vacation rental villa in the Palo Alto gated (24/7 security-attended) community in Playa Hermosa. LOVED our place (http://www.vrbo.com/131769). If you aren’t into AI’s or hotels, vacation rentals are a fantastic option, and often the same price as a hotel, but with the ability to shop for groceries and save a little money and feel like you are at HOME. I highly recommend Casa Manana – the owner Dirk Owen (Texas) was wonderful about helping us coordinate everything. This villa has a private pool with a waterfall (back massager!), very good A/C, lots of room, beach towels, a beautiful kitchen and patio, reliable WIFI, and a VOIP phone to use to call US or Canada free. Would definitely stay here again!

Casa Manana in Playa Hermosa
Parks we visited:
After visiting Playa Grande/Tamarindo, we found an animal sanctuary on the way back. It was so worth the stop ($10/pp). This is about as close as you can get to the wildlife! http://www.monkey-park.org/

Playa del Grande
Rincon de la Vieja National Park – Went to Buena Vista (http://www.buenavistalodgecr.com/) and did the Megacombo package for $80/pp including the zip line canopy tour and water slide, lunch, and the Hot Springs via horseback. Lunch was buffet style and not very good – but it was OK to get through the next half of the excursion. We drove there ourselves and moved quickly between activities rather than stick with one group, so it was much faster than the estimated 6-7 hours stated on the website, going this route. There are lockers and changing rooms at each stop to hold your bags/etc. The water slide was AMAZING and sooooo refreshing after the very hot canopy tour. I recommend long shorts and a t-shirt or tank for the day – with a swimsuit underneath or in your bag. You just need your shorts to be long enough to fit under your harness – knee-length is best. If you wear short-shorts, you might have (as another person stated – a “Brittany moment” – haha!). We saw Howler Monkeys dangling over our heads while waiting on the canopy platforms, and the staff was extremely friendly, professional, safety-oriented, and conversational. They all spoke excellent English. We really wanted to purchase photos from the canopy tour and waterslide (since we didn’t carry our camera on those for obvious reasons – and they take pics FOR you) but the guy was taking a nap when we went to the photo booth. Darn. We have our MEMORIES I guess! You can take a small camera/videocamera on the canopy tour – I just had my huge SLR, so didn’t want to lug that along…. Lesson Learned: ALWAYS bring a tiny point-and-shoot that you can hook to your beltloop/etc.

Horse Back Riding at Rincon de la Vieja National Park
Palo Verde National Park – When we arrived, there was an entrance fee of $20/pp then you drive up to the park. There were only a few people around, but we got some directions from an employee at the Organization for Tropical Studies office to the Mirador del Roca Trail where you walk through a trail to a collection of large rocks and carefully climb up to a sweeping view of the Tempisque Basin. It was a scene reminiscent of Africa. So beautiful. Unfortunately, we were visiting during the dry season, as I understand that during the rainy season, it is filled with water and exotic wildlife! We were met with a couple of vultures at the top peeking down at us, but they let us come on up and take in the view… Breathtaking. Great place for photos.
AND… on the way back to Playa Hermosa, we stopped at the hidden Llanos de Cortez, 3km north of the Palo Verde road at Bagaces to find a STUNNING 50-foot waterfall! Before we walked down, we were greeted with a vendor selling ice-cold coconut milk straight out of the coconut. Lovely and refreshing! ($1/each). Another great spot for photos and taking a dip in the water!

Palo Verde road at Bagaces
Barra Honda National Park – Had a very tough time finding this place, since our guidebook gave directions from Liberia on Highway 1, rather than Route 21, but we finally found an entrance road in Nicoya – accidentally, and after some crabbiness on my part ☺. And BOY was it WORTH IT! Once we arrived (finally) at the Park Office, we paid $36/pp ($10 entrance, $26 for a guide) and drove a few kilometers with our guide in our car (to save ½-hour of time) to the trail to Caverna Terciopelo. This is where the 4×4 manual came in handy as the roads were very steep. Once we arrived at the trail (which gets only 2-3 visitors per day!) we saw a ton of monkeys and birds – our guide Jose was the “Bird Whisperer” – he would make the bird sounds and they called right back. So cool. Then we arrived at the cavern entrance and put on our climbing harnesses and helmets to descend the 70-foot aluminum ladder that was attached closely along the wall.
It was incredibly thrilling to climb down the slippery ladder, even though we were safely tethered to a safety line! At the bottom we were handed our headlamps and started exploring the PITCH BLACK caverns. AMAZING experience. Some spots were so tight, you had to really concentrate to maneuver/crawl through the small openings. Jose showed us the exact hand and foot placement along the way – as it is very slippery and covered in bat droppings and water! At one point we dropped both water bottles out of the outside pockets of our backpack and Jose shimmied through a tight hole and retrieved them. What a guy! This place is not for the claustrophobic or faint-of-heart. BEST experience we had the entire trip!!! Then we got out safe-and-sound and drove our two guides back to the Park Office. Save this excursion for last – because your clothes and gym shoes will be a nice shade of brown when you come out ☺

Caverna Terciopelo at Barra Honda National Park at the Nicoya entrance
Beaches: Playa Grande near Tamarindo is beautiful, Playa Ocotal was a nice black sand beach. Playa Hermosa was gorgeous, Playa del Coco had a construction project going on so we didn’t go down to the beach (you can have access), but enjoyed it many nights for sunset at Beach Bums. It was just SO HOT that we didn’t spend a lot of time on the beach. Went fishing from Playa Hermosa one day with “Freddy” but the fish were sleeping that day ☺
Driving: Our 4×4 manual transmission came in handy on some of the park roads, particularly at Barra Honda, where there are some steep hills going up to the canyon. The off-highway roads up to the national parks are jarring and I cannot imagine driving a car through it. Our SUV’s shocks were almost non-existent, but still better than a sedan!
Dining/Nightlife: Had 3 amazing dinners at Papagayo Seafood restaurant in Coco – excellent Sea Bass, Snapper, and Shrimp (Hello Martin!). Pizza (American habit) at Coconutz was great – they even have a movie night on Wednesdays. Fun! In Hermosa – Hotel El Velero is right on the beach and has GREAT breakfast/lunch/dinner. Our nice waiter also let us borrow a few hotel beach chairs one day (shhhh!) Pretty much spent most of our time in Coco, even though we stayed in Hermosa (short 8-minute drive). Beach Bums in Coco is a great place to enjoy a cold drink and watch the beautiful sunsets (Hola Daniel and Melissa!), as well as Hotel El Velero.

Playa del Coco
Weather: In the mid 90’s every day – HOT, only a few sprinkles of rain here and there, and one afternoon it rained quite a bit, stopped for the evening, and then rained again overnight. But not enough rain to put a damper on any of our plans!
Drinking Water: At first we only used bottled water, but eventually started drinking the tap water. I realize it is “safe” but still different from what we are all used to at home, so I was leery. Worked out just fine!
Arriving in the Evening: We got into town from Liberia Airport after all of the stores were closed and ended up at the Upper Deck Sports Bar thirsty and starving. We were the ONLY ones there on a Friday night. But the manager was so kind and stayed open late for us. We asked her about renting beach umbrellas and she gave us her card and said we could use HERS. Very kind people in Costa Rica! It was dark and we were unfamiliar with the roads, but knowing what we know now, you could easily get to Playa del Coco in about 8 minutes where there are tons of bars and restaurants to choose from.
Tipping: Your dining/bar check will include a 10% gratuity and also a 13% sales tax. So 10% extra (before taxes/gratuity) will be more than enough. We still left 20% many times when we had superior service. What is a few more dollars if you can spare it and you can help in a tourist-based economy during the slow season? Also, be prepared for the guy at the beaches and restaurants that will say “I watch” (your car). 500 colones or $1 will satisfy this guy.
Money: Didn’t exchange ANY currency. Most places will give you the price in colones and dollars. Did get colones out of an ATM, which was helpful for small purchases like fresh fruit stands.
Top Things to Pack:
1. Bug Spray – Any time you are walking through the forest, you will need it.
2. Sunscreen – This goes without saying. The sun is VERY intense 10 degrees from the equator.
3. Half the clothes and TWICE the money. This old saying rings true in CR. It was as expensive as Key West.
4. Patience – Some of the best places are tucked away with very little signage, but if you are patient, you will find them!
Sure I’m forgetting something! But hope this helps for those of you that rent a car and want to venture out on your own! PURA VIDA, Costa Rica!!!!
Israel Adventures
Posted on December 1, 2007 Leave a Comment

Jaffa, Israel
Disclaimer: Please forgive me if I have any location names wrong here – it was quite a whirlwind of activity on this intense tour and so I didn’t have much time for note-taking.
We went with a small group of about 20 people in November and had a private tour guide for the entire trip. Our guide had a wealth of knowledge and explained in depth the historical, religious, geographical, political, and archaeological background of each area that we visited. A tough feat – but he had an objective and scholarly approach that made our trip enriching in a way that I can’t imagine is true with larger tour groups. We toured Israel for 8 solid days and as you all know, there is too much to see in one venture.
Here is a summary of our amazing adventure and first trip to Israel:
Day 1 – We arrived in the afternoon at Tel Aviv and stayed at the Metropolitan Hotel right on the beach. That night we joined up with our group and had a nice dinner together in the hotel and prepared for our upcoming adventures.

Tel Aviv
Day 2 – Let’s start with breakfast. WOW! Israeli breakfasts have such an enormous selection of foods! So, you don’t have to worry about any dietary restrictions because there is something for everyone. We then visited Jaffa, Caeserea Maritime, Mt. Carmel, and then on to the Sea of Galilee. We stayed at the Gai Beach Hotel in Tiberias, which was very comfortable and had a pretty view.

Caesarea
Day 3 – We took a boat trip from Tiberias to Kibbutz Ginossar to visit an ancient 2,000 year-old boat. We then continued on to Capernaum “the Town of Jesus”. Next we drove to Golan Heights to Banias at the foot of Mount Hermon. That evening we enjoyed a Shabbat Dinner at the Gai Beach Hotel in Tiberias. We are not Jewish, so this was a first-time experience for my husband and me. It was very merry with a lot of singing and dancing, not to mention a feast fit for a king!

Capernaum, The Town of Jesus
Day 4 – Our trip seemed to get better and better each day, leading up to more exciting visits as the days progressed. We started the day at Yardanit to see the Jordan River and then drove to Zippori.

Tel of Megiddo
We continued on to Megiddo, walked through the water tunnel built by King Ahab in the 10th century BC, and then drove to Beit Shean. This was my favorite place of the entire trip! It was exhilarating to walk along the colonnaded streets from the time of the Romans.

Beit Shean
Next, we headed south to get the first glimpse of the Holy City of Jerusalem. We stopped at an overlook and enjoyed a toast with our group in celebration of our arrival. From here, we stayed at the Mt. Zion Hotel in Jerusalem for the remainder of our trip. Our room had a fantastic view of the Old City and was very comfortable and within walking distance to restaurants and shops. That evening we visited Ben Yehuda Street after dinner for shopping and entertainment. There were crowds of people surrounding dancers and musicians. You must visit Ben Yehuda if you are in Jerusalem on a Saturday night!

Jerusalem: The Holy City
Day 5 – We started the day with a drive to the lowest spot on earth where the Jordan River empties into the Dead Sea. We toured Qumran, site of the Dead Sea Scrolls discovered in 1947, and then drove to Masada where we rode a cable car to King Herod’s fortress palace. Next was a visit to Ein Gedi for an opportunity to float in the Dead Sea.

Masada
Day 6 – We started the day at Yad Vashem, Israel’s memorial to the Holocaust. We wished later that this was the last trip of the day as it left us with a flood of emotions.

Yad Vashem Holocaust Memorial
Next we visited the Shrine of the Book Museum and then continued on to the Mt. of Olives for a view of the Old City and surrounding area. We visited the Garden of Gethsemane and the Church of All Nations. We viewed the City of David and ascended to Mt. Zion to see the Upper Room and King David’s Tomb. We then entered the City via the Zion Gate and walked along the ancient street of Cardo. Next, we visited the Ecce Homo – the control center of the Praetorian Guard in the 1st century and then on to visit the Garden Tomb or Gordon’s Calvary.

Garden Tomb, Jerusalem
Day 7 – We toured the Old City of Jerusalem where we saw the remains of the City of David and continued through the Dung Gate of Jerusalem to visit the Davidson’s Centre. Next, we moved on to the Western Wall and we were able to enter the Rabbinical Tunnel. We moved on to “The Temple Institute” and then visited the Hashmonean Homes in the Jewish Quarter. In the evening we tried a fantastic local Argentinian restaurant, El Gaucho, with steaks as their specialty.

Christ Church, Jerusalem
Day 8 – This was a free day and we broke out in smaller groups. Our group chose to go to The Shuk (the market). It was great fun to shop and talk to the vendors. I have never seen so many baked goods in one place! We bought “rugula” (sp?) and it was heavenly! We returned to the Cardo and Jewish Quarter for lunch and more shopping and had a farewell dinner with our group and tour guide before everyone packed for our long trip home.

Banana Vendor at the Jerusalem Market
Travel Tips:
1. I did not take any long skirts or head coverings for the trip and found that I did not need any. My husband did take a baseball hat and needed it for a few of the places that we visited that required men to cover their heads. I found that dressing in layers worked well since the temperatures fluctuated greatly from morning to evening. We took an umbrella, but luckily it did not rain during our trip. Clothing choices consisted of nice jeans, “dockers” style pants like cargos or khakis, gym shoes, light zip-up sweaters/sweatshirts, nice tee-shirts, and nicer items for dinner, although it was pretty casual everywhere we went. It is cold at night this time of year (November) – so bring a thick wrap or sweater.
2. Sunscreen is a good thing to bring. I got a little sunburned in Masada, even with two layers of sunscreen on.
3. I found that bringing a light backpack was great for the tour so I could have a jacket and my camera, lenses, etc. right with me while being hands-free to explore. For everyone that told me to bring sensible shoes – THANK YOU! I wore loafers on the first day, but switched to comfortable and sturdy gym shoes for the remaining days. I am not the type to wear gym shoes anywhere other than the gym, but trust me – bring along a well-broken in pair so you can be comfortable and walk safely in the more rugged areas.
4. The shopping was great. We brought back some unique items from Jerusalem and we spent a fortune at the Ahava store at the Dead Sea (but you get a much better deal this way than ordering online). The products that we bought from the Dead Sea are amazing. I have very dry skin and the Ahava Dermud is like a dream come true!
Thanks to all of my TripAdvisor friends for answering all of my many questions and giving great tips and advice while planning. It truly was a trip of a lifetime!
